Twinchie Butterflies
I used a Nicecrane image Called Butterfly Twinchies, you can use a digital or a stamped and clored image
Wether you use digitals or hand stamps, you will need two sets. Here I printed two sets of the

Nest step in creating the 3D glassy butterflies
Dollop on a thick layer of Modge Podge
I use my finger, nothing fancy - just try to get a fairly even coat.

I purchase my Modge Podge on Amazon, for 29.99 a GALLON free shipping!
This takes about two hours to dry
Here you can see the butterflies before I fussy cut them.

The next step requires fussy cutting the focal images. The Modge Podge give the paper a vinyl feel and makes it very easy to cut. After cutting the images I edge them with black marker.
Here is the card!! The glossy butterflies are hot glued on to the same image on the card layer.


Here is a side view to help you see the 3D effect. This is so easy and works so well!

I hope you give this a try, it is well worth you time
Inspirational previous works:

And waht about this stunning Note Book? by Julia?

Inside of Folder


___________________________
Another(Coloring Digis) Step-by-Step...
...and news of a new Facebook group.
I love the way Toni Johnson color my Digis so directly from her blog,,,,,,,this stunning Coloring Tuto.Ignacio (Nicecrane Designs) asked me if I would do another tutorial with an image that he had offered as a freebie to one of my fellow 'teamies' for her new facebook group. When I saw this adorable image, how could I say no...

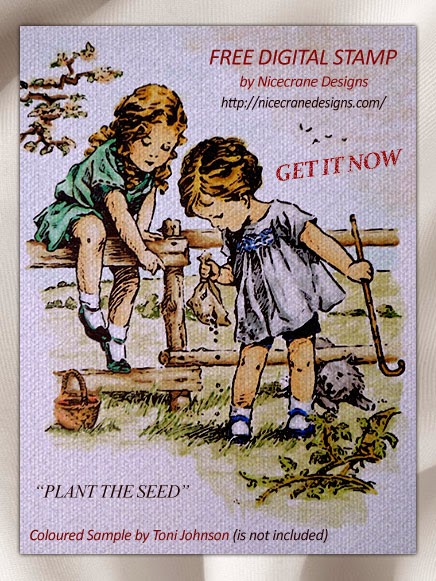
The image is so lovely - I had it downloaded and printed off in the blink of an eye...

...then I had to decide how I was going to set about colouring it in.
Starting with the sky, I gave the whole area a gentle swipe of colour using the chisel end of my pens...

...I was pleased with the result that I had achieved with my Fairies and Angels image (previous post) so I decided to stick with the same colours...

...in fact, there were just two colours BT1 (Blue Turquoise) and FS8 (Flesh) - oops, didn't realise the pen was round the wrong way - and the blender pen to bring them together. FS8 is quite a strong colour so I used the blender pen to dampen the area where I wanted this shade and then very gently swiped the colour across. I then used the blender to even out any areas where the pen caught a little too much. At this point the sky was very pale but that is the joy of alcohol pens - you can come back and build up the colour later (if you want).
There was an overhanging branch in the top left corner which I completed next so that I wouldn't be rubbing my hand over the main part of the coloured image later...

...I used TN4 (Tan) for the wood, DG1/2/3 (Dull Green) for the leaves and FS1 & 8 for the blossom. You can see that the colour has bled a little - this helps to soften the look of the blossom.
The next stage was to give the ground some colour by swiping with the chisel end of CG3 (Citrus Green)...

...the fence and seed bag were also given a hint of colour using EB1 (Earth Brown).
The large areas of grassland were given a quick swipe of DG1 - I have left some of the streaks showing to give texture. The hedges and blades of grass were coloured with the bullet end of the pens in DG2 & 3. The brambles in the bottom right corner were give more detail using CG2 & 3 along with a touch of GB3 & 5 (Gold Brown)...

...the basket was given some colour using some of the Tan shades and I started to add colour to the dog using IG1 & 3 (Ice Grey). A bit of shading was added to the fence...

...the EB2 and GB8 look quite harsh here but by using the EB1 over the top the shades start to blend together.A touch of BG1 & 3 (Brown Grey) was added to the dog...
 .
.
..and the first shade was added to the skin areas...

...FS1 is used here for the first of the fleshtones.
Here is my little copper-headed miss. Shades used to achieve the hair colour are TN1, GB1/6/7...

...the smock of the other child was coloured using BGR1 & 3 (Blue Grey) with a touch of TB6 (True Blue). Now this is another area where I made good use of the blender. BGR1 all over and BGR3 for the shadows was rather flat so the blender was used to smooth the shades into each other and to take some of the colour away where the 'light' would be hitting - it also helps to give a slightly faded and worn look. The TB6 was just used to pick out the smocking across the top.
I used GT1/2/3 (Green Turquoise) for the dress of my little redhead...

...on this occasion, I started with the two darker shades to highlight the creases and shadows and then used the lightest shade to colour over the top and blend the shades together.
The second child has been coloured as a blond using GB8 & 9 and CT2 (Citrus). A little IG1 to give the children's socks a bit of shape, some blender to take away some of the orangey hews from the basket and a little more BT1 added to the sky...
 .
.
..and there you have it - all done.
So if you would like to give this a go, don't forget you can grab this freebie...
...by using the link under the B/W image at the top of this post.
Now folks that visit here on a regular basis know that I don't 'do' Facebook. However, my fellow DT member Ginny is setting up a "Christian Card-makers around the World" group over on Facebook and as I know many of you are on Facebook I thought you might want to go and take a look. You can hop over to Ginny's blog to find out more details or go directly to the Facebook group via;
Ginny has some super stuff on her blog so I'm sure you will find more goodies on the Facebook group...............................................................
Flowers in every shape and form
My son in laws sister has just got engaged so I made this card for them; nothing says congratulations more than flowers does it?

The lovely vintage flower image is a new one from Nicecrane Designs and is available to buy here . Ignacio has got some lovely new spring images in his store. He has also sent me some wonderful chick ones to play with for Easter which I will be creating some more guest design work for him soon.
Here are a couple of close ups. I think for a first time my handmade roses worked out OK.
The flowers were made with my Marianne die and the leaves are Cheery Lynn. The lovely engagement and little tag sentiment are both by Lili of the Valley

I distressed the edges of my papers and also used lots of vintage photo distress ink to give a real vintage feel and I also added 2 brass coloured charms from my jewelllery stash.


________________________
Special Thanks to Toni for these incredible colored digi


 Posts
Posts

