Squash card/book tutorial
Brenda did a really so different and all over stunning Squash Christmas Card and she is explaining a faboluos How-To tutorial , so you can create your ownamazing one..You can`t miss her incredible work:


Open view by Brenda
Hello all you lovely Peeps, I have a little project to share which after finishing thought it might be useful to do a tutorial as there are always new crafters in blogland, so I have made a start on another and took a few photos along the way.
Front Cover Card
How-to :Cardstock: Three 8"x8" pieces 220/250gsm for the main card and two 4"x4" pieces of a heavy weight for the front and back panels. Coordinating DP's: Two pieces 5"x5" for front and back panels, ten 3.5" squares, four left whole and six cut diagonally Scoreboard and scoring tool, glue and choice and images, ribbons etc., to decorate.
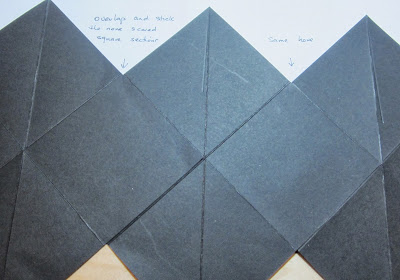
Score each 8"x8" square as indicated above I have made the photo's large in the hope you can read the directions and my current appalling writing - things can only get better
Glue the three pieces together as indicated above
Now fold each scored line both ways to make the whole piece more flexible and then into the finished shape
This is how I deal with my box lids and the same process works for this project and below the finished panel ready to be adhered to the main piece. And finally add all the internal square and triangle DP's sections and decorate.
I am not totally convinced my explanations Yo can get a Video Tutorial HERE:
Easy,faster and so funny,,,,,,,TRY IT.
And HERE are my Christmas Sheets:
____________________________
A Christmas... Birdhouse !!!
Now I am showing you the ABSOLUTELY GORGEUS PLAY OF ART by Cahterine, a Really Amazing Christmas Bird House.You were warned : I told you that there would be some birdhouses for Christmas and here is the first one... (Yes, there will be more to come !!!)
Amazing Bird House by Catherine
Insn`t it so adorable, so unique, so amazing,,,, ( I want a one)
And I have made a matching gift bag to put it in !
Recipe : Papers from Marianne Design - Flowers : Dies from Creata - Leaves and Corners : Dies from Marianne Design - Berries, Ribbon, Cheese Cloth and Pine Cones from Live and Love Crafts - Image from NiceCrane Design ("Christmas Children Greetings" Collection) - Berry Pick Garland, Star and Moss from Calico Crafts - The frame was made in a silicone mold, using Martha Stewart Paper Clay - Letters : Die from Tim Holtz.
And my cute Sheets:
__________________________
Angelica `s work


paint to give it a weathered, aged look.
Enjoy the amazing work by Mia`
The images from Nicecrane are absolutely adorable and I had so much fun creating with them. So, I was inspired by autumn colours, different shades of brown and green. I also love fairies as you might have seen on my projects before and this little girl was so cute sitting quietly and speaking to her friend, the frog.
Absolutely a delicious to watch,,,
And what about this creation by Gunn
Pink is actually one of my favorite colors. So for this project I wanted to make a Art Journal page. I use the Vintage Vanity journal from Prima. Great for those not so big projects. I fell in love with this Victorian Art collection Pack. And the image i choosed, is perfect for The Pink month in my mind.
Finally I am showing the work by LindaSS
As you can see I also played with some mists, paints, mediums and more... I just had a blast..


5 comments:
So many beautiful creations!
Wonderful projects. Great tutorial by Brenda. Thanks for the freebie!!
Florence x
wow such gorgeous cards and creations beautiful made.
and lotts of gorgeous old vintage pictures.
gr karin
So many different projects with your images Ignacio, it just shows how very versatile they are and will fit into all our different crafting styles.
B x
Another great tutorial that I will have to try out. Stunning vintage images and a fabulous bird house creation by Catherine. Also thanks for the freebies.
Regards,
Lisa
Post a Comment